How to Sharpen a Chef's Knife at Home
To sharpen a chef's knife at home, use a whetstone at a steady angle until a burr forms, then refine the edge with lighter strokes. Choose a guided sharpener if freehand control is your main concern.
On this page (8 sections)
- What do you need to sharpen a chef's knife?
- Which grit should you use to sharpen a chef's knife?
- How do you set up the knife and stone?
- How do you sharpen each side of the blade?
- How do you refine the edge and remove the burr?
- How should you check and care for the knife afterward?
- What mistakes make home sharpening harder?
- Which method should you choose to sharpen a chef's knife?
To sharpen a chef's knife at home, work each side against a whetstone at a steady angle until you raise a burr, then use lighter strokes to refine the edge and remove the burr. If freehand control feels difficult, a guided sharpener can help you keep the angle consistent.
Choose the tool according to the knife's condition and the way you want to work. A stone teaches control and offers different grits, a fixed-angle system reduces angle guesswork, and a honing rod is for upkeep between sharpening sessions.
For the full stone technique, see how to use a whetstone. This guide covers tool choice, setup, sharpening strokes, and the mistakes most likely to slow you down.
What do you need to sharpen a chef's knife?
You need an abrasive sharpener suited to the edge, a stable work surface, and a towel. If you choose a water stone, check whether it needs soaking or only surface water before you begin.
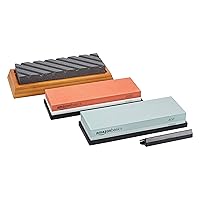
The Amazon Basics set has 400/1000-grit and 3000/8000-grit double-sided whetstones, an angle guide, a flattening stone, and a non-slip bamboo base. It suits a home cook who wants several grits and stone maintenance in one set; skip it if you want to avoid freehand sharpening or stone cleanup.
Use the 1,000-grit side for a dull but intact edge, then move to a finer surface if you want to refine it. The 400-grit side is for more substantial repair, so don't start there for routine touch-ups.
A towel under the base can catch water and help keep the counter tidy. Keep the stone secure, clear nearby clutter, and make sure your handle and hands are dry enough to grip safely.
Which grit should you use to sharpen a chef's knife?
For routine sharpening, start around 1,000 grit when the knife is dull but has no major chips. Use a coarser grit to remove more steel from a damaged or very dull edge, then use a finer grit to refine the new edge.
A fine grit alone may take too long to restore a blunt knife. A coarse grit can remove more steel than needed, so match the stone to the edge's condition and move to finer grits as the edge improves.
The Amazon Basics set's 400, 1,000, 3,000, and 8,000 grit surfaces give you a coarse-to-fine progression. Most home sharpening sessions don't need every grit, so begin with the one suited to the edge and stop when the result meets your needs.
Read the whetstone grit chart if the numbers are unfamiliar. For a wider comparison of stone types, see sharpening stones for kitchen knives.
How do you set up the knife and stone?
Set the stone on a level counter with its base secure and clear space around it. Wet or soak the stone only as its instructions require, and keep a towel within reach.
Hold the knife by its handle and place the heel of the edge on the stone. Rest the fingers of your other hand on the blade's flat, with those fingers well behind the cutting edge.
A sharpening angle around 15 to 20 degrees per side works for many kitchen knives, but the knife's existing bevel is the best guide. An angle guide can help you find a repeatable position while you learn.
How do you sharpen each side of the blade?
Move the blade across the stone at a steady angle, covering the edge from heel to tip. Use light, even pressure, and lift the knife to reset rather than dragging the edge back at a different angle.
- Set the heel against the stone at the angle you chose.
- Move the blade so the section at the heel travels across the stone.
- Continue the stroke along the blade toward the tip, adjusting your hand position to keep the bevel in contact.
- Lift and reset the knife, then repeat with even pressure across the full edge.
- Check for a burr on the opposite side before switching sides.
The exact stroke direction matters less than maintaining contact with the bevel and sharpening the whole edge. Avoid rocking the blade or letting the tip slide off the stone.
How can you keep the angle steady while sharpening a chef's knife?
Keep your wrist quiet and move your arm and shoulder together. A guide can help at first, but don't force it against the blade or let it pull the edge away from the abrasive.
The Work Sharp Precision Adjust Kit uses an adjustable guided system with angles from 15 to 30 degrees. It suits cooks who want a repeatable angle across kitchen and other knives; skip it if you want the feel and flexibility of freehand stone work.
Secure the knife as directed and move the abrasive with controlled pressure. A guide helps with angle consistency, but careful handling still matters near the edge.
How do you know when to switch sides?
Switch sides when you can feel a small burr along the opposite side of the edge from heel to tip. Check gently by moving a fingertip from the spine toward the edge, never along it.
If the burr forms only near the heel or tip, focus strokes on the section that still needs work. Once you raise a burr along the full edge, sharpen the other side until the burr moves back.
Then alternate a few light strokes per side to reduce the burr. Use less pressure as you finish, since heavy strokes can leave a rough edge or raise another burr.
How do you refine the edge and remove the burr?
Use a finer grit and lighter alternating strokes after both sides meet at the edge. You are refining the edge and reducing the burr, not grinding heavily.
If your stone has a finer side, rinse or wipe it as its care instructions require before you use it. Make a few smooth strokes on each side, then alternate sides with progressively lighter pressure.
The HORL 3 Cruise uses a diamond disc followed by a stainless steel honing disc, with 15- and 20-degree angle options. Its rolling format suits cooks who want guided motion and no water setup; skip it if you prefer freehand sharpening on stones.
Keep your fingers clear while checking the edge. Rinse and dry the knife first, then make a careful cut through paper or soft food; stop if the edge catches or feels uneven.
How should you check and care for the knife afterward?
Rinse the blade, dry it fully, and make a careful cut through a soft food such as a tomato. A sharp edge should begin the cut without heavy pressure, and you should never test it by dragging a finger along the edge.
Wash and dry the stone after sharpening, then store it according to its care instructions. If the surface develops a hollow, learn how to flatten a whetstone.
A honing rod can help maintain an edge between sharpening sessions. The Utopia Kitchen 12-inch rod has a carbon-steel body with nickel-chrome plating and a nonslip handle; it suits cooks who want a simple upkeep tool, but skip it as a replacement for abrasive sharpening on a truly dull knife.
Use the rod with controlled strokes and keep it clean and dry after care. See how to use a honing rod for a step-by-step maintenance routine.
What mistakes make home sharpening harder?
Changing the angle mid-stroke, pressing too hard, and sharpening only one section are common causes of uneven results. Slow down, keep the bevel in contact with the stone, and cover the full edge before switching sides.
Don't begin with the coarsest grit unless the edge needs repair. Don't let the stone slide, and don't grip a slick handle with wet hands.
Avoid checking sharpness with a finger along the edge. If the knife is badly chipped or you can't hold it securely, take it to a qualified sharpening service.
Which method should you choose to sharpen a chef's knife?
Choose a whetstone if you want grit options and are willing to learn freehand strokes. Choose the Work Sharp if keeping a steady angle is your main concern, and the HORL if you prefer a guided rolling motion without a water stone setup.
Use the Utopia rod for light upkeep between sharpening sessions, not to restore a badly dulled edge. For a simple starting point, the Amazon Basics set includes a medium grit for routine work plus coarser and finer surfaces for different edge conditions.
The right answer to how to sharpen a chef's knife depends on its condition and the method you'll use consistently: start near 1,000 grit for a dull, intact edge, then refine with light strokes. If you choose stones, follow the whetstone soaking guide before your first session.
Frequently asked questions
What grit whetstone should I use for a chef's knife?
Use a medium grit, often around 1,000, for routine sharpening when the edge is dull but not damaged. A coarse stone removes steel faster for a very dull or chipped edge, while a finer stone refines an edge that's already sharp.
Choose based on the blade's condition, not just the grit number.
How do I know when I've sharpened one side enough?
A small burr along the full length of the opposite edge is a sign that you've reached the apex on that side. Check gently with a fingertip moving from the spine toward the edge, never along the edge.
If the burr is missing in a section, keep working that section with controlled strokes.
Can I sharpen a chef's knife without a whetstone?
Yes. A guided system holds the blade at a set angle, and a rolling sharpener can simplify the motion.
A honing rod can maintain an edge between sharpening sessions, but it doesn't replace abrasive sharpening when the knife is truly dull.
Pick a tool that matches your comfort and the knife's condition.
How often should I sharpen a chef's knife?
Sharpen when the knife no longer cuts cleanly with normal pressure, rather than following a fixed calendar. How quickly an edge wears depends on how often you cook, the foods you cut, the cutting surface, and how you store and maintain the knife.
Use a honing rod for light upkeep between sharpening sessions.